If you’re planning to sell your iPhone, you have to make sure you take some precautions to protect your data and privacy. Erasing the data on your iPhone is essential to ensure all your sensitive information remains secure when your old phone exchanges hands.
If you’re unsure of what you have to do, we have you covered because this article will show you exactly how to erase your iPhone before selling it.
Get ready to sell your iPhone
There are a lot of things you’ll need to do to get the iPhone ready to sell or trade in. Consider this your checklist:
- Back up your data.
- Unpair your Apple Watch.
- Cancel any AppleCare plans for this particular device.
- Turn off Find My iPhone.
- Log out of iCloud and iTunes.
- Deactivate iMessage if you’re switching to an Android phone.
- Wipe your iPhone before selling it.
1. How to back up your iPhone before selling
There are quite a few ways to back up the data as you prepare to wipe your iPhone before selling it.
How to back up your iPhone to iCloud
If you’ve been using your iPhone for a while, you probably already have turned on automatic backups to iCloud. You should check and run an extra backup, just in case. Here’s what you have to do to back up your iPhone before selling it:
- Open the Settings app.
- At the very top, you’ll find the Apple ID, iCloud, iTunes & App Store settings alongside your name. Tap on it.
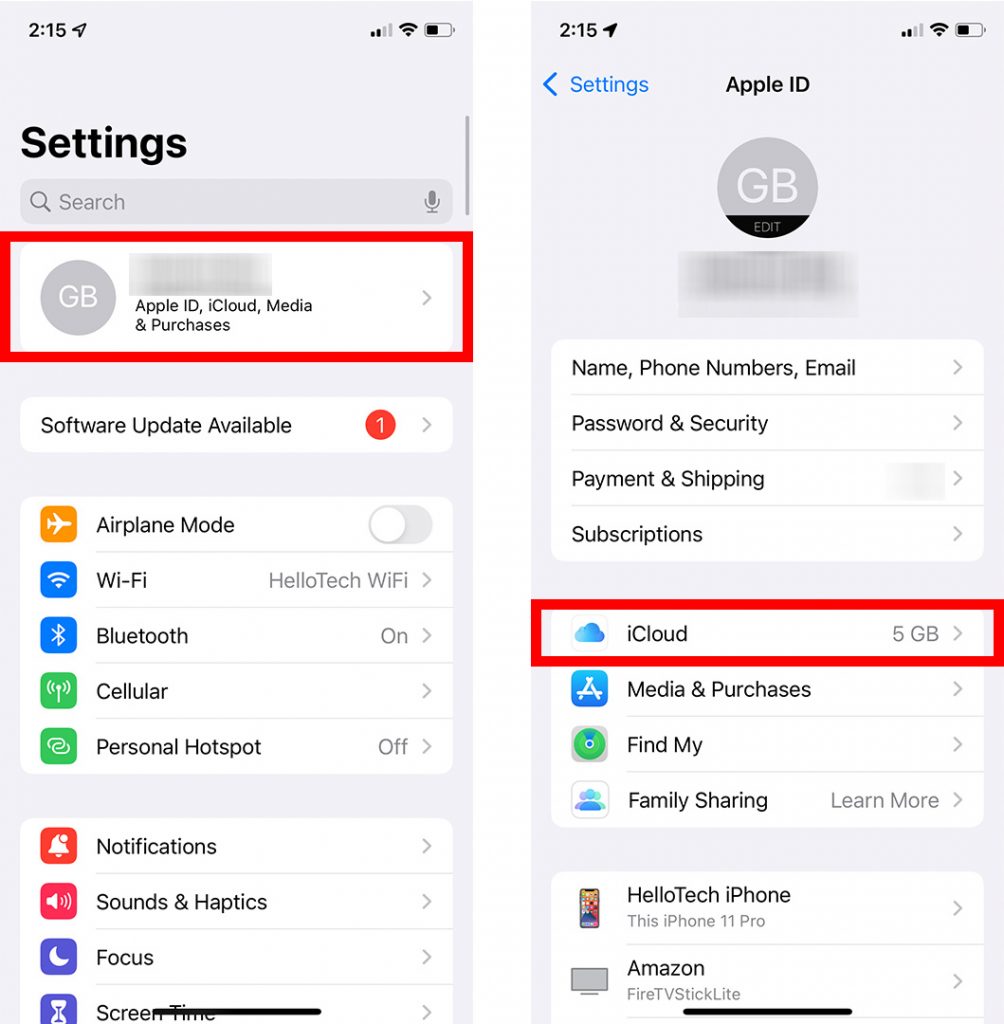
- In the next menu, tap on iCloud.
- Scroll until you find iCloud Backup.
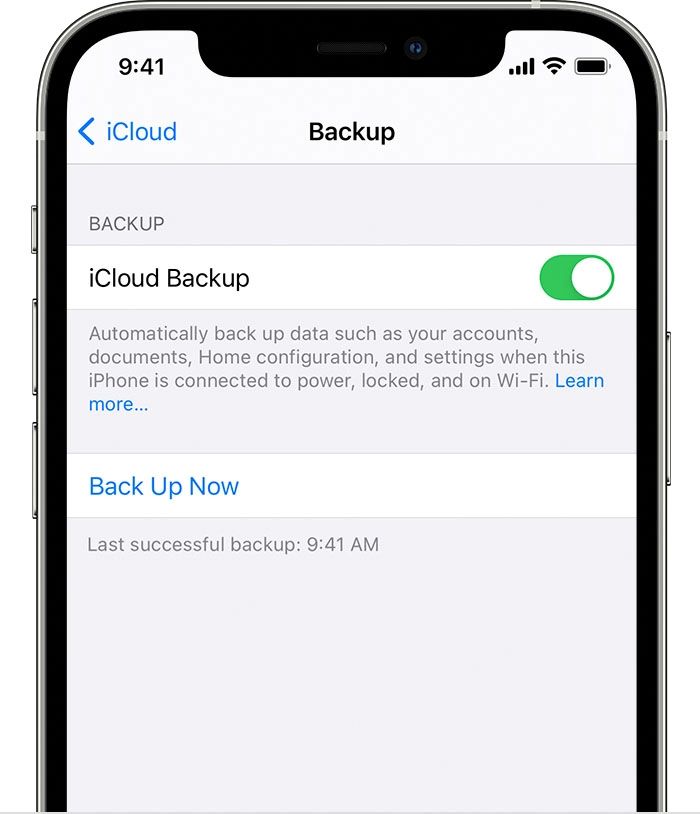
- Once you’ve tapped on it, you’ll see whether the feature was on. We recommend you manually use the Back Up Now feature to get all the latest data in the Cloud.
- Depending on how much data needs to be uploaded to iCloud, it may take a little bit for the task to complete.
Be mindful of the fact that Apple only offers 5GB of iCloud storage space for free. If you need more, you’ll have to get one of their subscriptions.
Backing up your iPhone to iCloud before selling it is ideal if your next phone is also going to be an iPhone.
How to back up your iPhone to iTunes
While backing up your phone to iCloud is ideal, you can also move all your data to iTunes.
- Install iTunes on your Windows computer if you haven’t done that already.
- Use a USB cable to connect your iPhone to the computer.
- Launch iTunes and press the iPhone button in the top left corner.
- Go to Backups and choose This Computer.
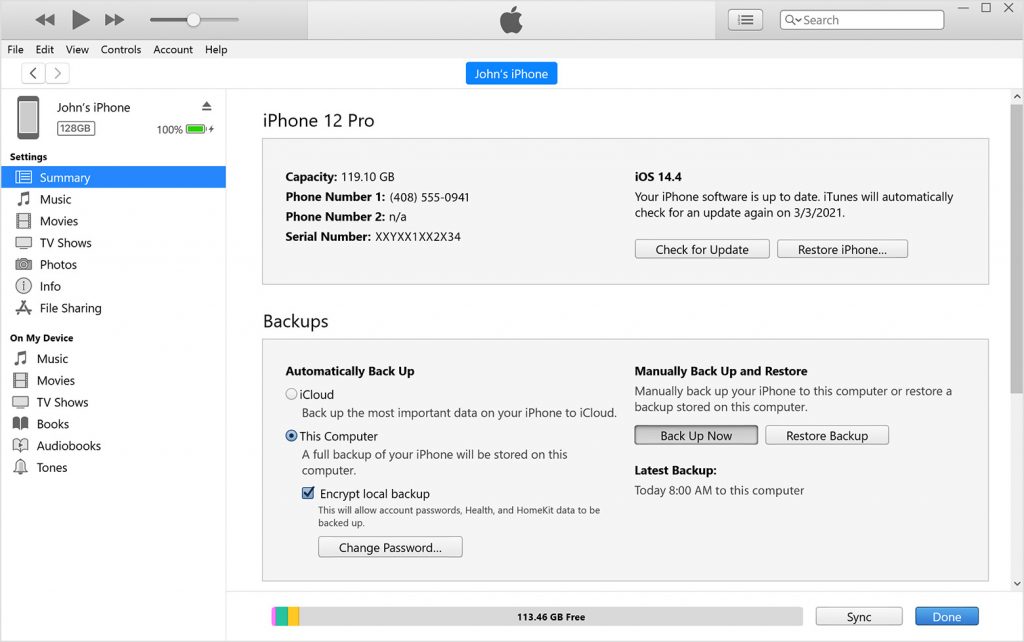
- Make sure you check the Encrypt local backup checkbox to secure your data. You’ll need to set up a password.
- Click on the Back Up Now button.
- Wait for the process to complete. Done!
This method is advisable if you’re going to be switching to Android.
How to back up your iPhone using your Mac
If you have a Mac, there’s also a way to get your iPhone ready to sell by backing up the information to your device.
Here’s what you have to do:
- Use a USB cable to connect your iPhone to your computer.
- Go to the Finder sidebar and choose your iPhone.
- Click on General at the top of the Finder window.
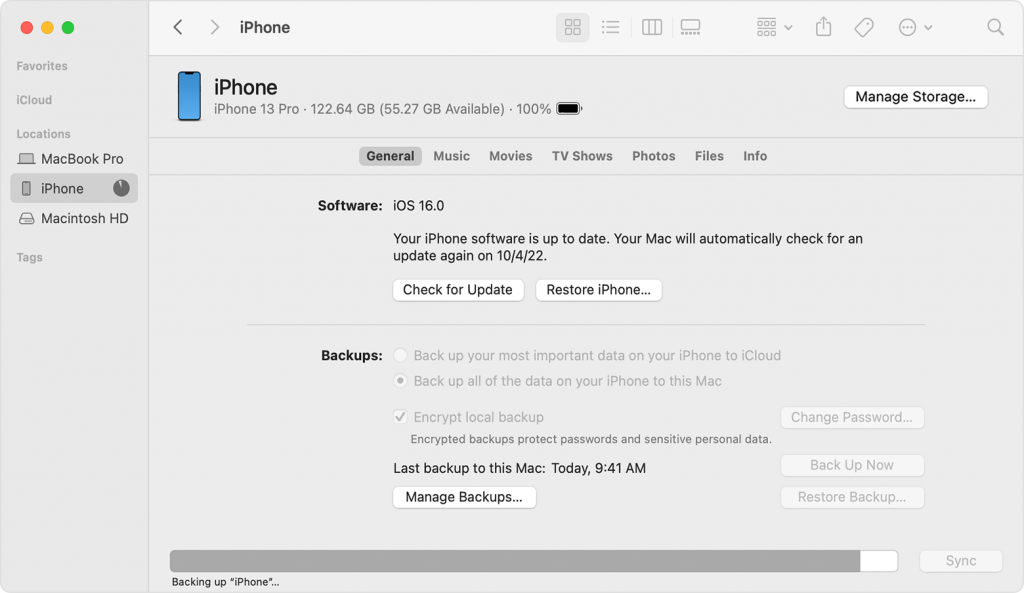
- Click on Back up all of the data on your iPhone to this Mac.
- If you want to encrypt your data, click on Encrypt local backup.
- Click Back Up Now and wait.
You’ll need macOS 10.15 or later for this to work, while earlier versions of macOS will need to use iTunes to back up iPhone data.
2. How to unpair your Apple Watch
As you prepare to clear your iPhone before selling it, it’s best to ensure you have all your bases covered, including unpairing your Apple Watch. Here’s what you’re going to need to do to make this work.
- Bring your iPhone and Apple Watch close.
- Open the Apple Watch app on your iPhone and go to My Watch.
- Tap on the small “i” icon next to the watch and choose Unpair Apple Watch.
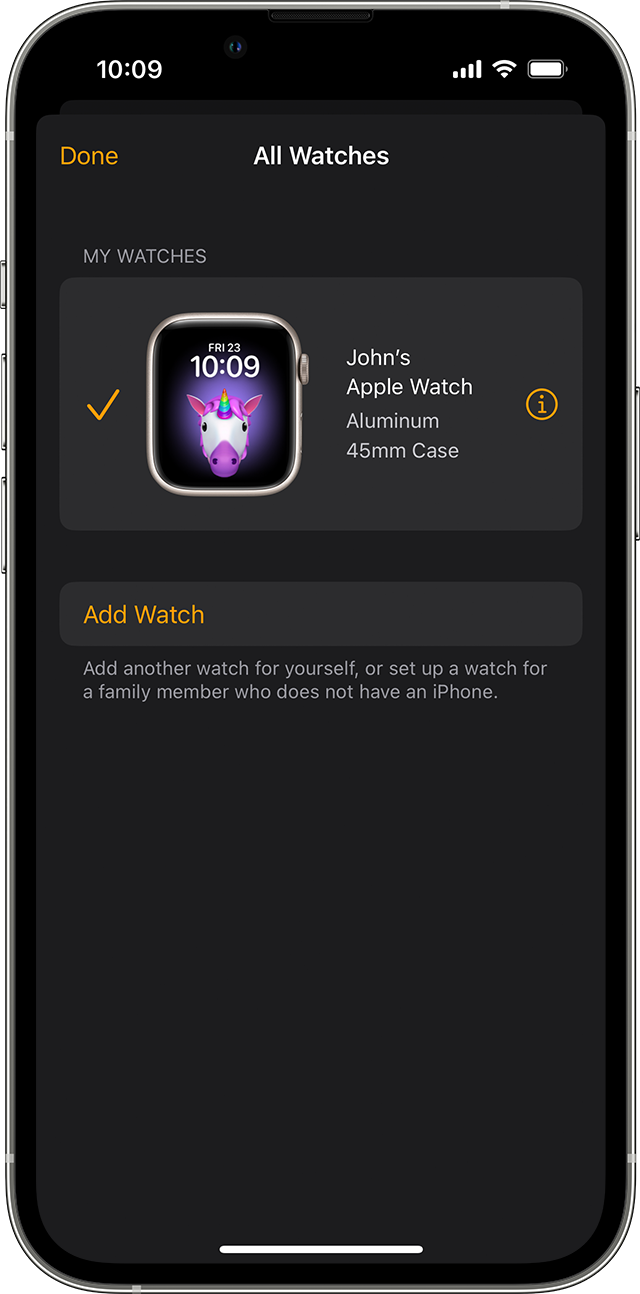
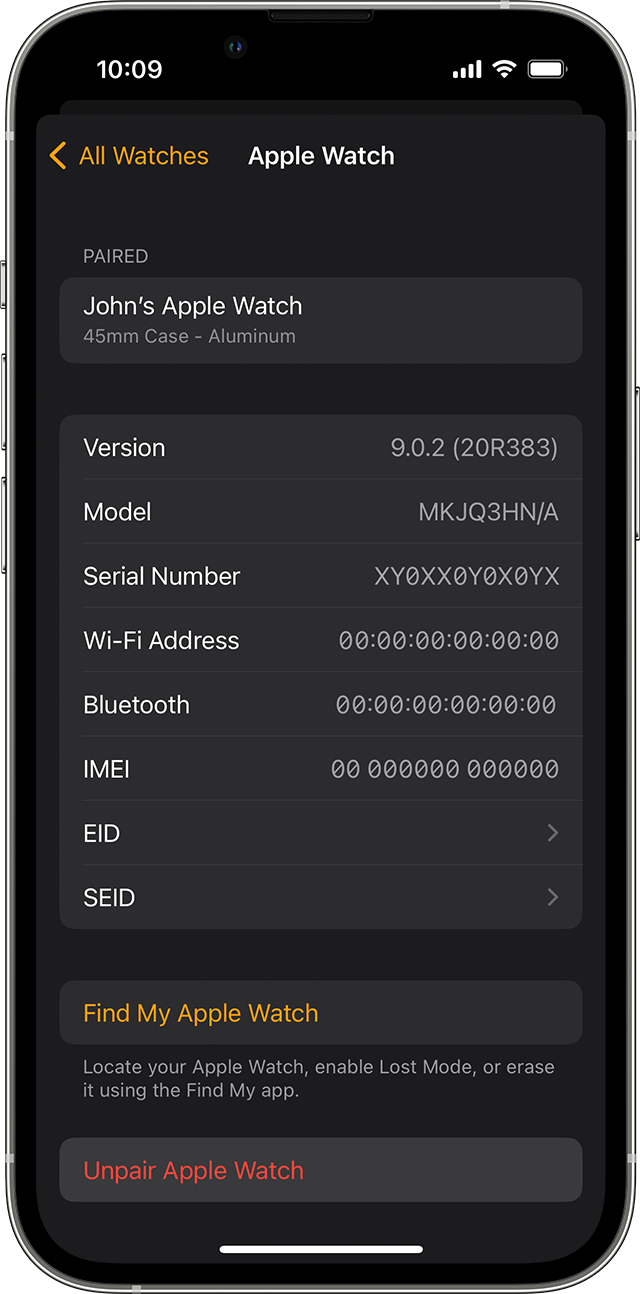
There you go, one step closer to being able to erase your iPhone before trading it in.
3. How to Cancel AppleCare
Having AppleCare for your iPhone is great because it provides you with coverage in case you break your phone, lose it, or have it stolen. Well, now that you’re selling or trading in your iPhone, that won’t be necessary for this particular device, so it’s time to cancel it.
- Launch the Settings app.
- Go to General.
- Tap About at the very top of the screen.
- Scroll down to AppleCare+ and tap it.
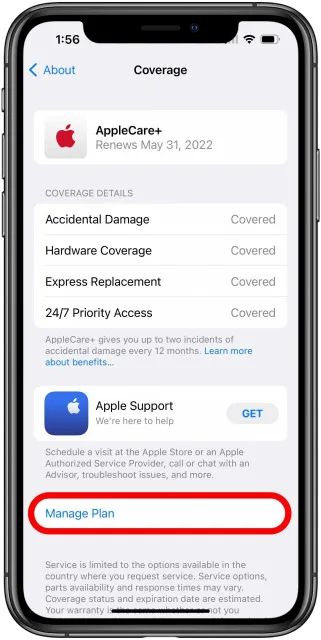
- At the bottom of the page, tap on Manage Plan.
- Tap Cancel Renewal at the very bottom of the page.
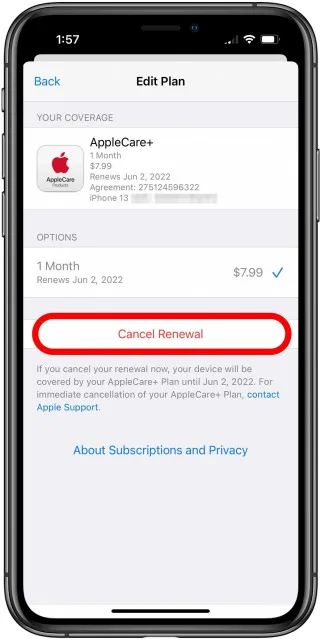
- Confirm the changes, and you’re done.
You’re now safe from paying anything for a device you no longer own.
4. How to turn off Find My iPhone
In theory, wiping your iPhone before selling it should cover all bases, including turning off the Find My device feature and so on. However, we’ve heard of cases where the erased iOS device was still linked to the previous owner’s account, so it’s better to cover all bases. So let’s dive into all the steps you have to take to turn off Find My iPhone.
- Launch the Settings app.
- Tap on your name at the top of the menu.
- Go to iCloud.
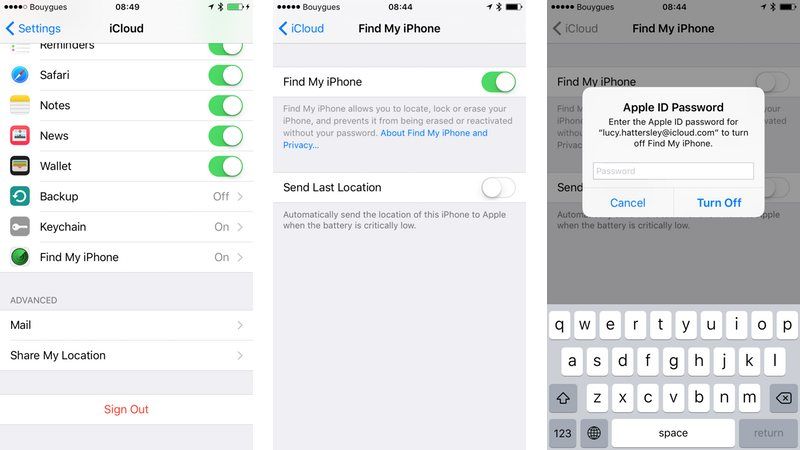
- Scroll down until you locate the Find My iPhone.
- In the menu, tap on the toggle to switch off Find My iPhone.
5. How to Log out of iCloud and iTunes
Once again, because it’s best if you deactivate and unlink iCloud and iTunes from your phone before erasing it, we’re going to go through these steps with you.
- Launch the Settings tool.
- Tap on our name at the very top.
- Scroll to the bottom and tap Sign Out.
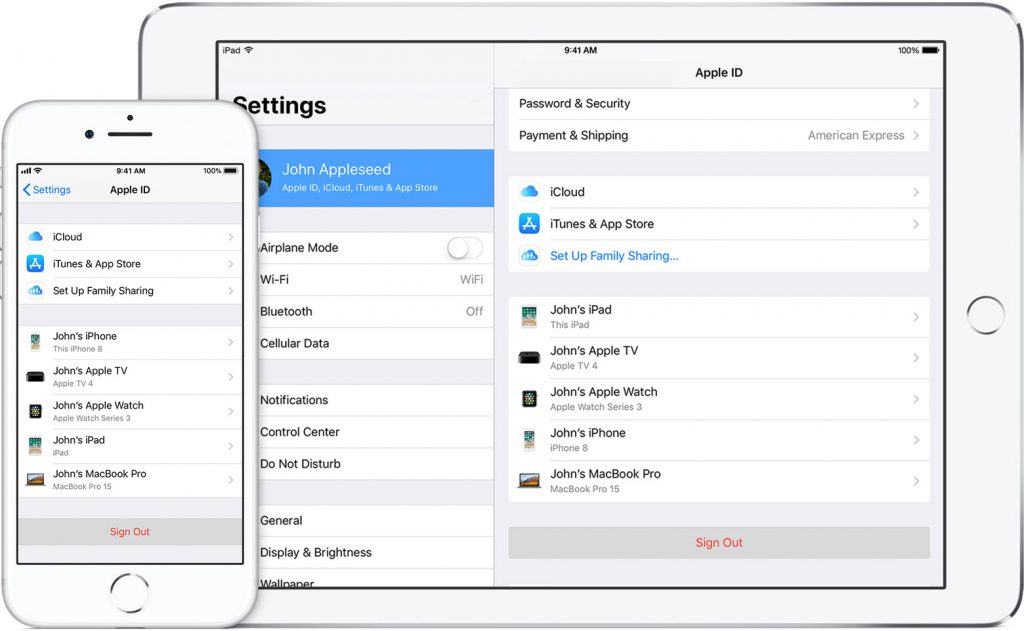
- You’ll have to enter your Apple ID password and tap the Turn Off button.
Now you’re officially logged out of both iCloud and iTunes on this device. You’re almost ready to wipe off your iPhone.
6. How to Deactivate iMessage
If your next phone will be an Android device, you’ll need this extra step. This is necessary so you can continue receiving SMS messages on your new device. If you’re sticking to Apple products, you can skip this one.
- Take out the SIM card from your iPhone and put it in your new phone if you haven’t already.
- Open the Settings app.
- Go to Messages and tap the toggle to turn it off.
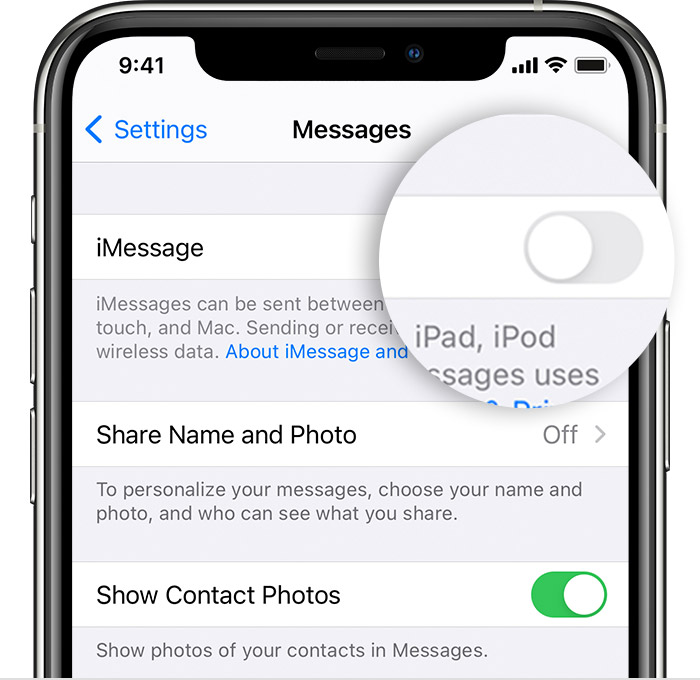
- Go back to Settings and tap FaceTime.
- Toggle off the feature.
That’s it! You’re (finally) done.
7. How to erase your iPhone before selling
Here’s how you can reset your iPhone before selling it in a few easy steps:
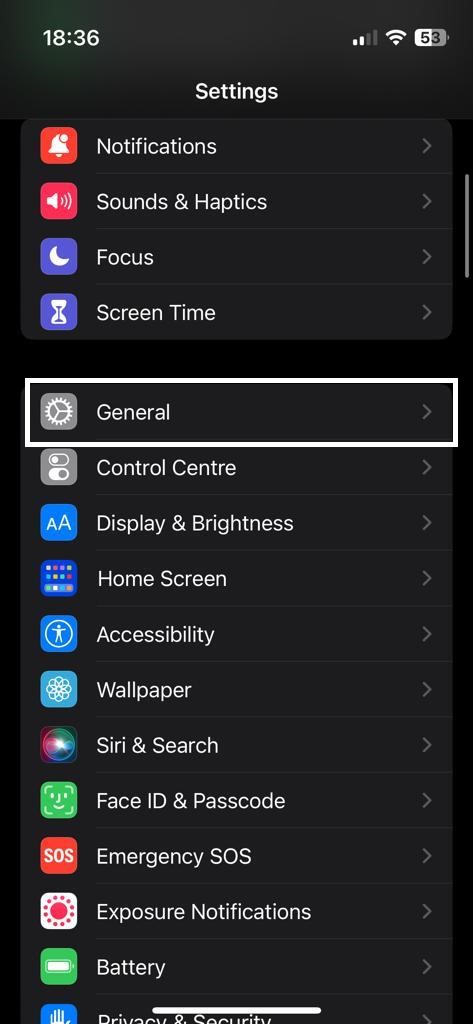
- With the backup secure in the cloud, it’s time to wipe your iPhone. The first thing you’ll have to do is go to launch the Settings tool.
- Tap on the General field.
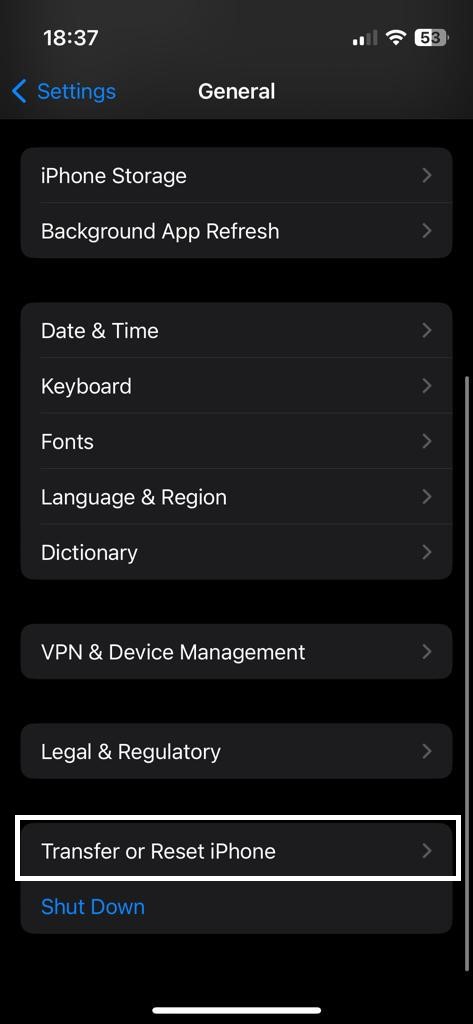
- Scroll down and tap on Transfer or Reset iPhone.
- Choose the Erase All Content and Settings option.
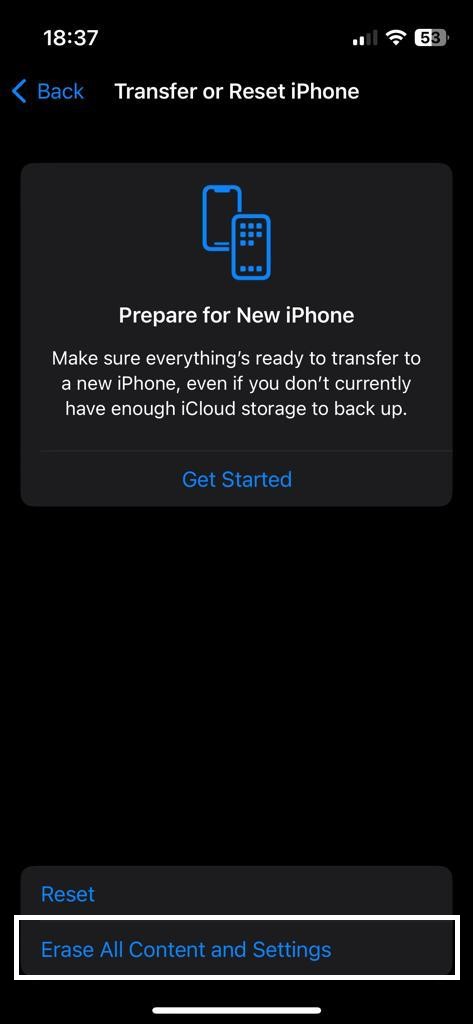
- Enter your Apple ID password, as requested.
- Confirm you want to wipe your phone clean.
- eSim users will be asked to remove their profile too.
- If Find My iPhone is still on, you’ll have to input your Apple ID and password again
- Once you’ve confirmed you want to erase all content and settings off your iPhone, all information is completely removed and your phone is wiped clean. The process can take a few minutes to complete. When it’s done, remove the SIM card from your phone.
By following these steps when erasing an iPhone before selling it, anyone who acquires your old device won’t have access to any private information associated with it – such as contacts, emails, or images – which helps keep both yourself and others safe and secure while disposing of your old device responsibly.
If you want to make more money off your phone, we know a few tricks to increase your phone’s trade-in value.